DocsSetup
Microsoft 365 / Exchange Online
Two connectors and one transport rule in the Exchange admin center, then a DNS record. Every screen, in order.
Updated August 29, 2026
This guide connects a Microsoft 365 tenant to RubySig. When it is done, every message a user sends to someone outside your organization is stamped with their signature and DKIM-signed for your domain, and is still delivered by Microsoft.
You will create, in this order:
- An outbound connector — how Exchange hands mail to RubySig.
- An inbound connector — how RubySig hands stamped mail back.
- A transport rule — the switch that decides which mail goes through RubySig, with the exception that prevents a loop.
- One DNS record for DKIM.
Everything happens in the Exchange admin center at admin.exchange.microsoft.com, signed in as an Exchange Administrator. Have your relay address from the portal's Setup page ready; it is written as <tenant>.smtp.rubysig.com throughout and you substitute your own.
Note: Your domain must already be verified in the tenant (Microsoft 365 admin center → Settings → Domains, status Healthy). Do not run the domain wizard's DNS step as part of this setup — RubySig does not take over mail delivery, and there is no reason to let the wizard rewrite MX or SPF.
Step 1 — Outbound connector
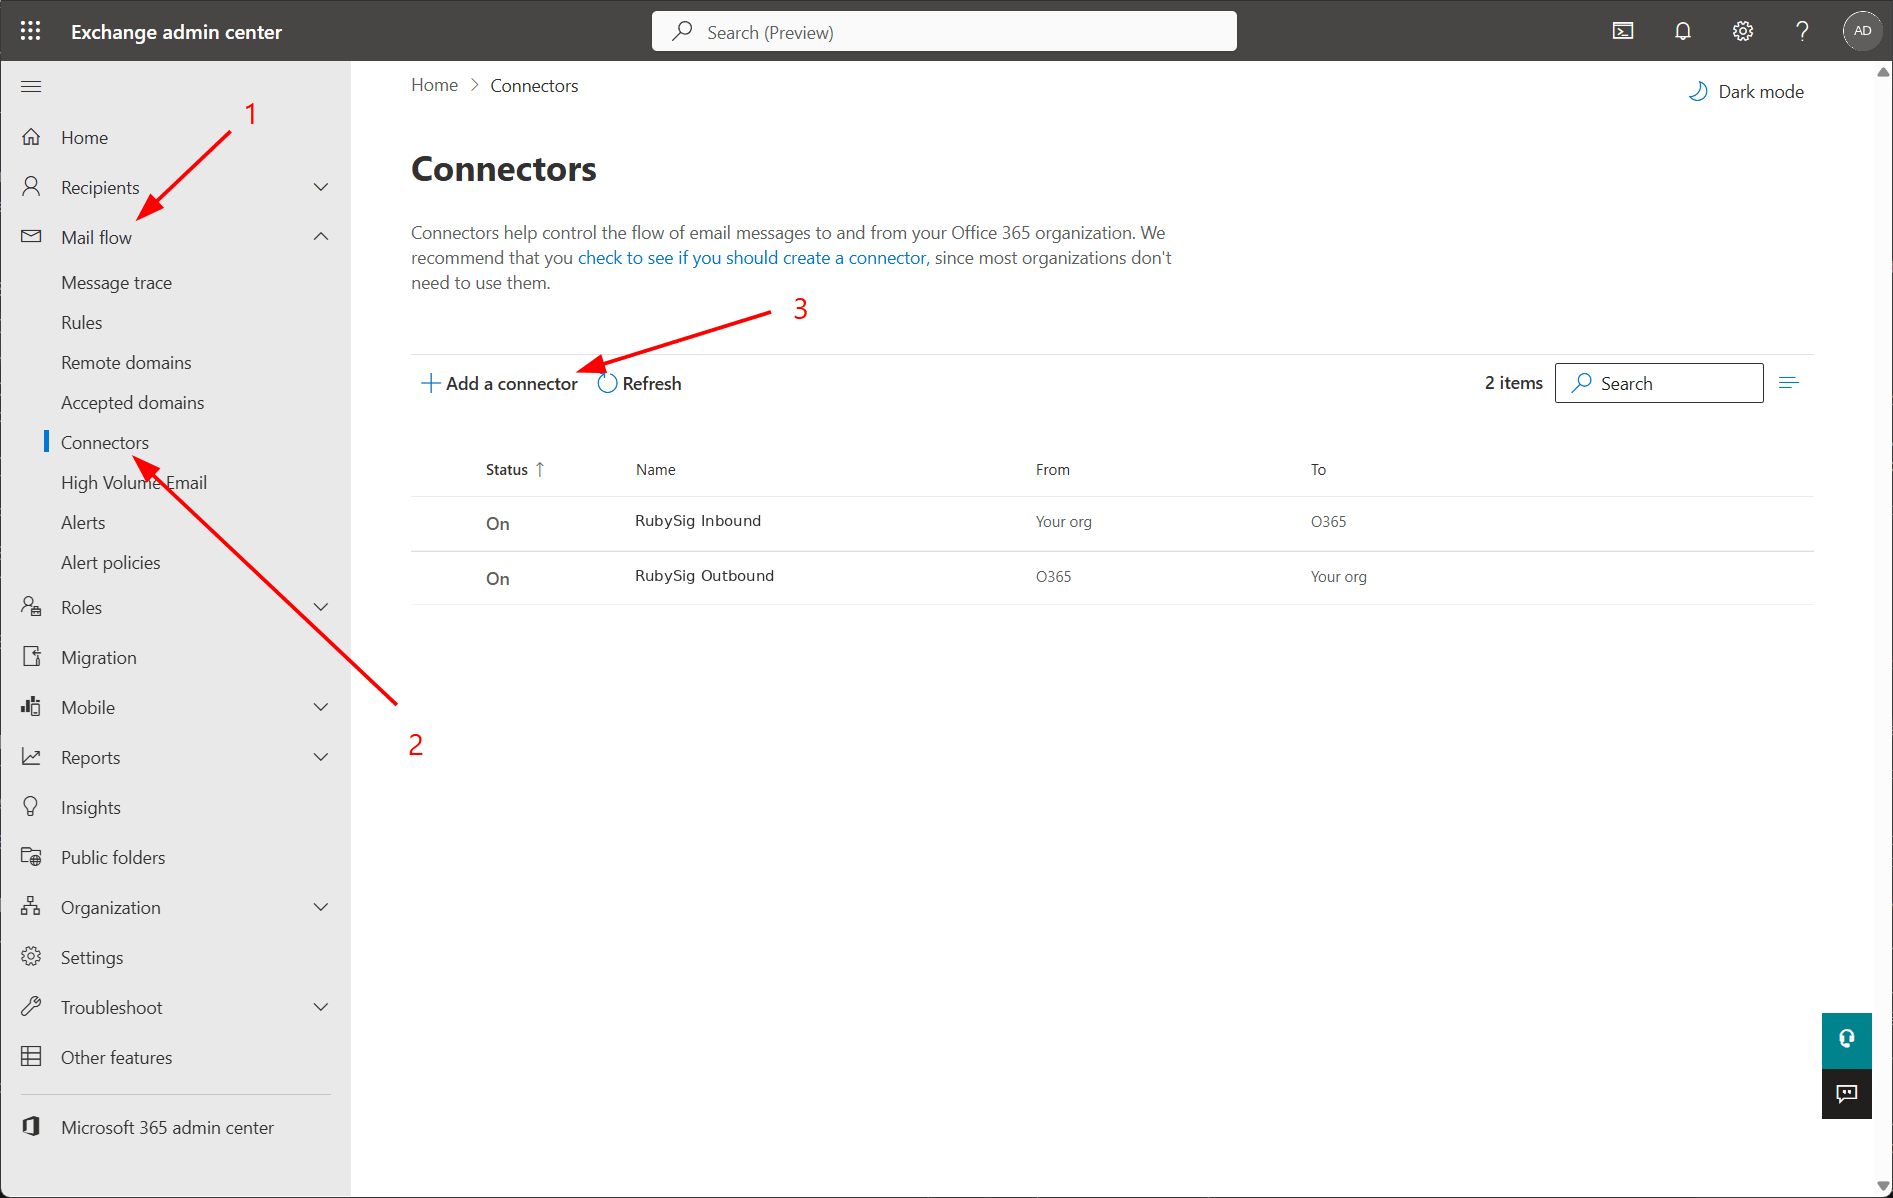
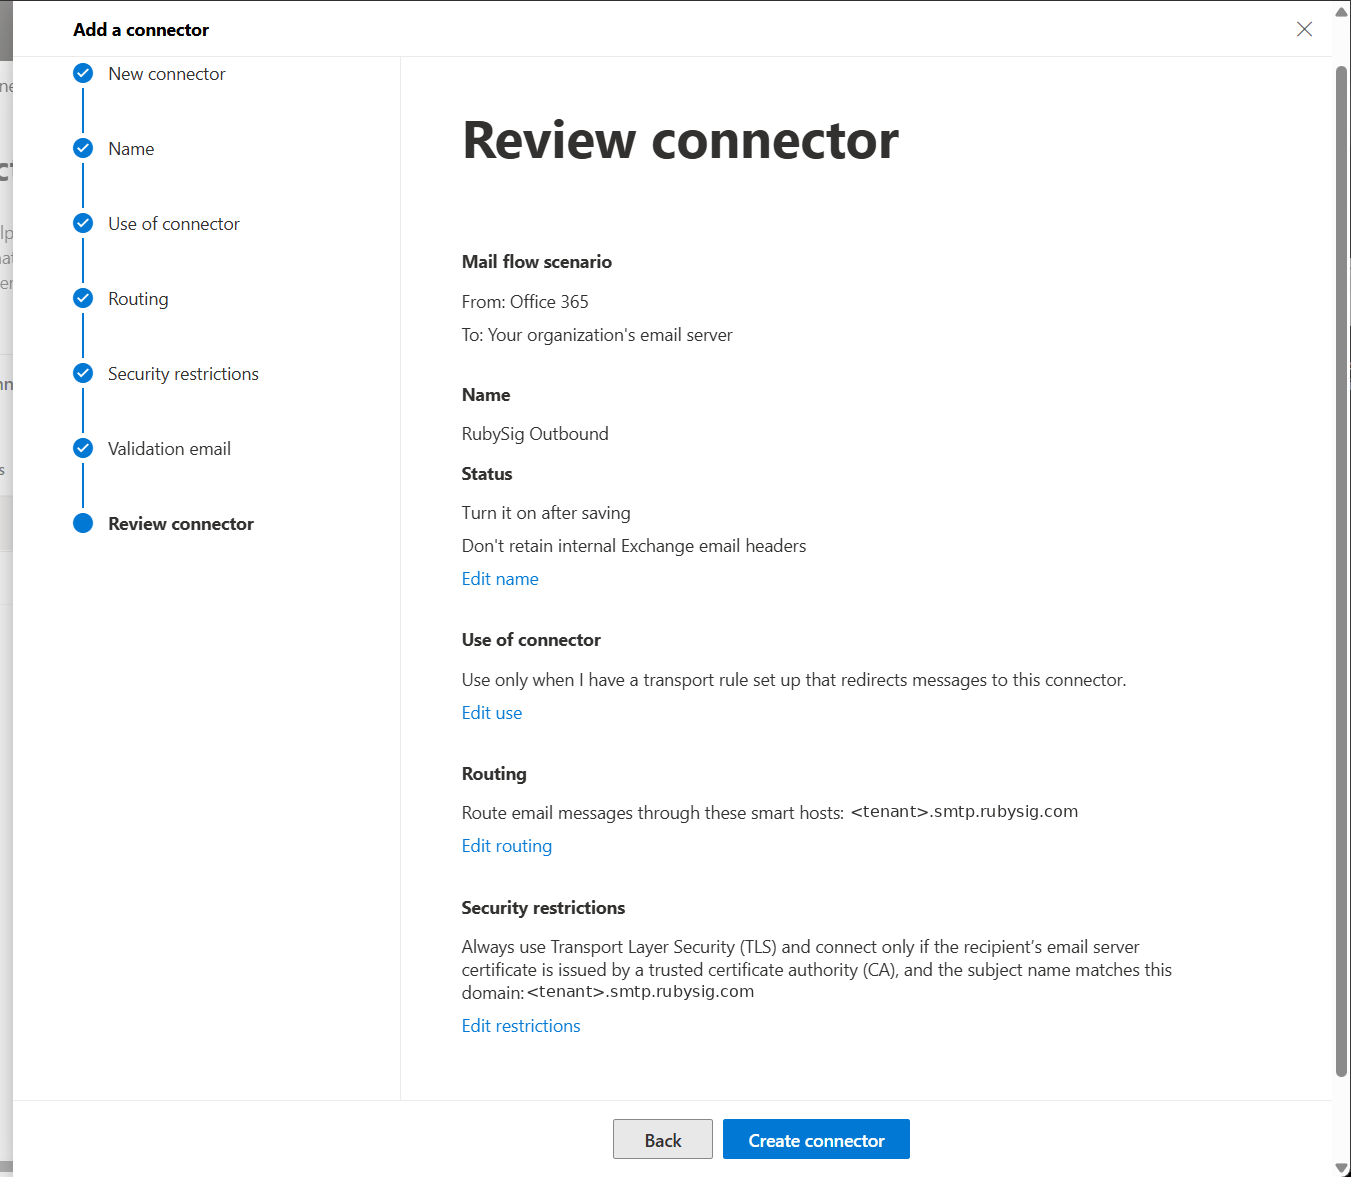
In the Exchange admin center, open Mail flow → Connectors and choose Add a connector.
Connection from and to
Under Connection from pick Office 365. Under Connection to pick Your organization's email server. RubySig plays the role of your own mail server here: Exchange hands the message to it, and it hands the message back.
Name
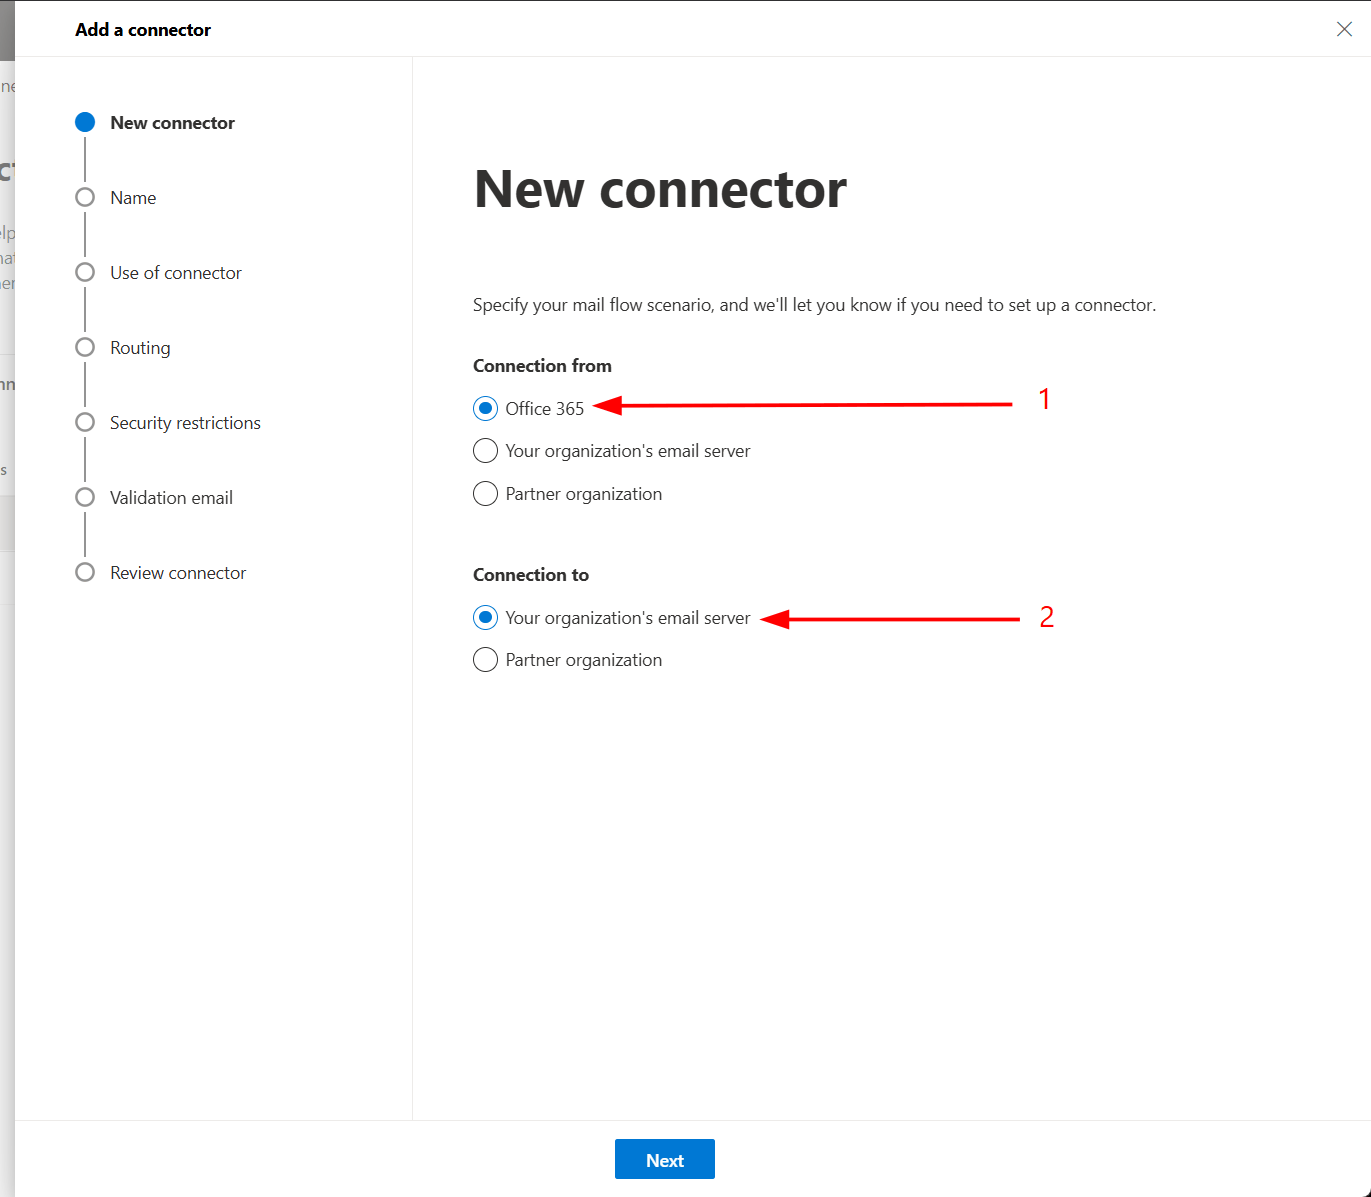
Name it RubySig Outbound. Under What do you want to do after connector is saved? tick Turn it on and leave Retain internal Exchange email headers unticked.
Use of connector
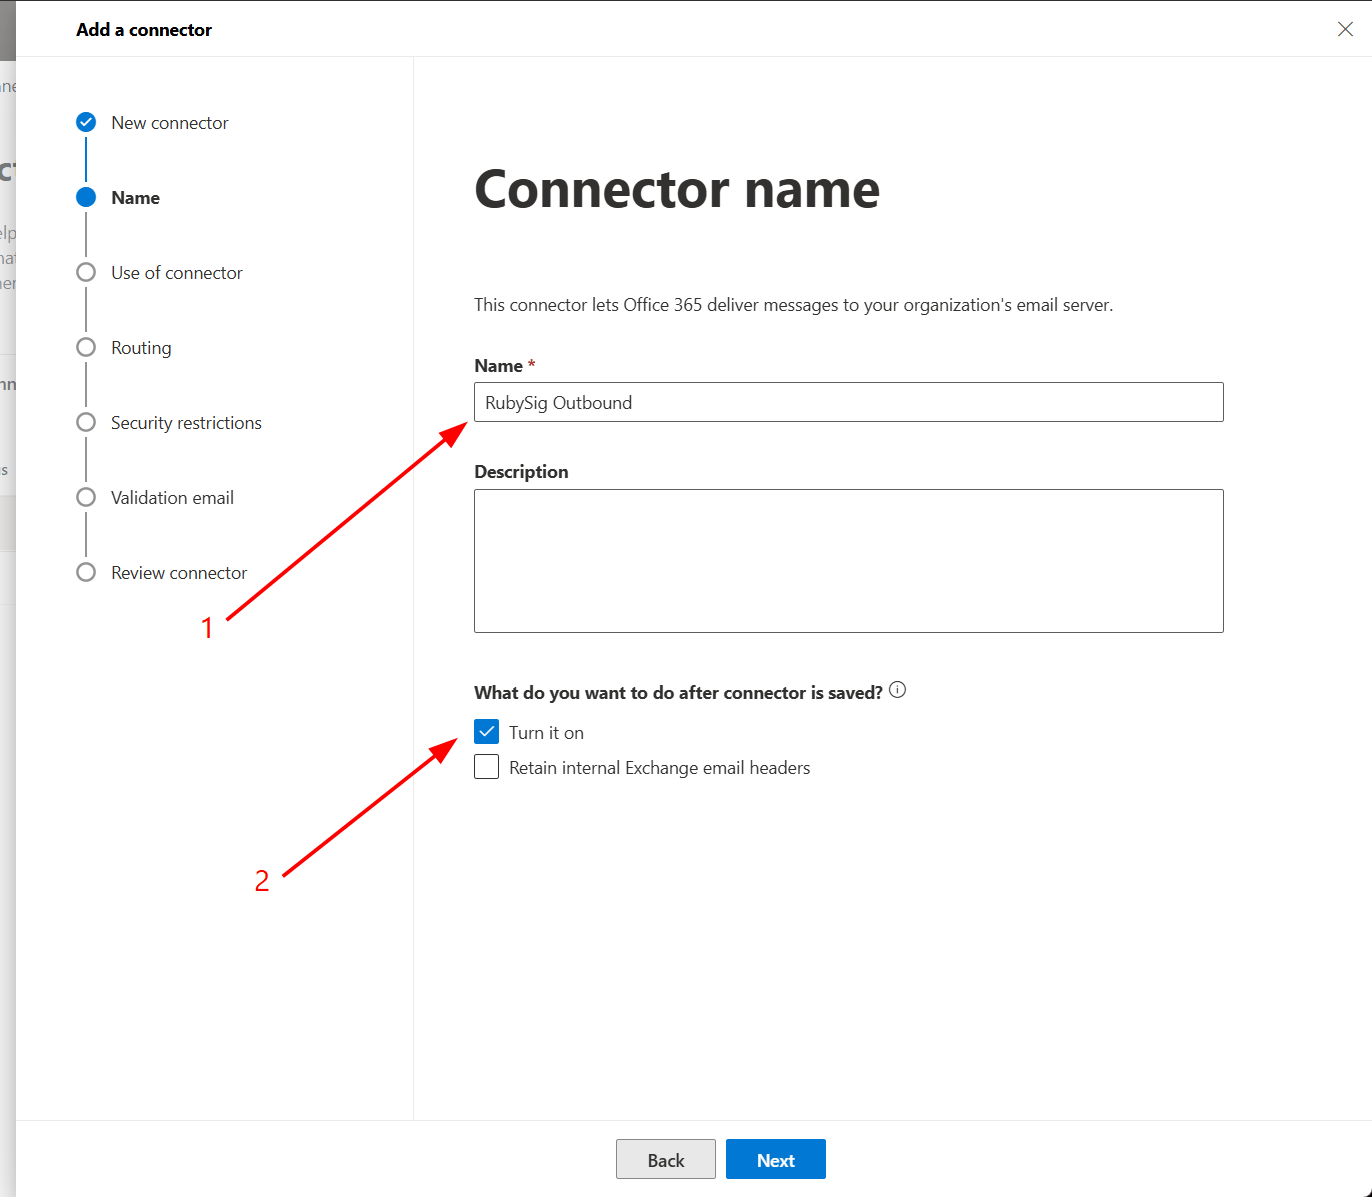
Choose Only when I have a transport rule set up that redirects messages to this connector. The rule you create in Step 3 is the only thing that sends mail through this connector.
Routing
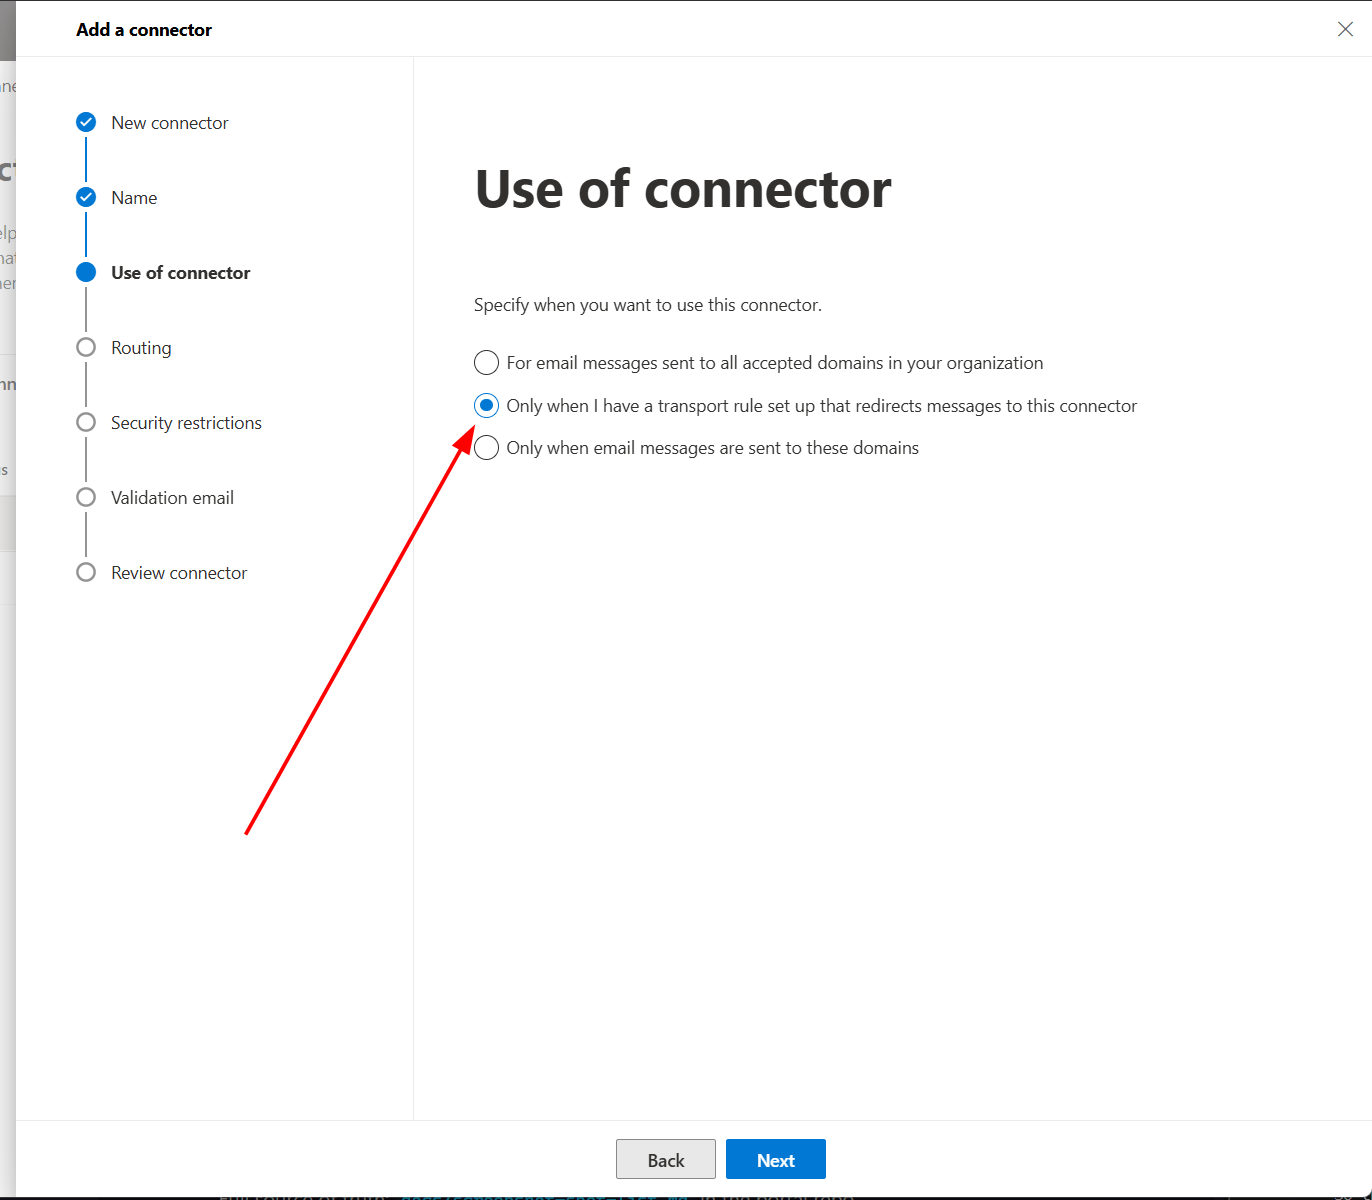
Select the smart-host option and add your relay address — <tenant>.smtp.rubysig.com, from the portal's Setup page. Click + after pasting it, then Next.
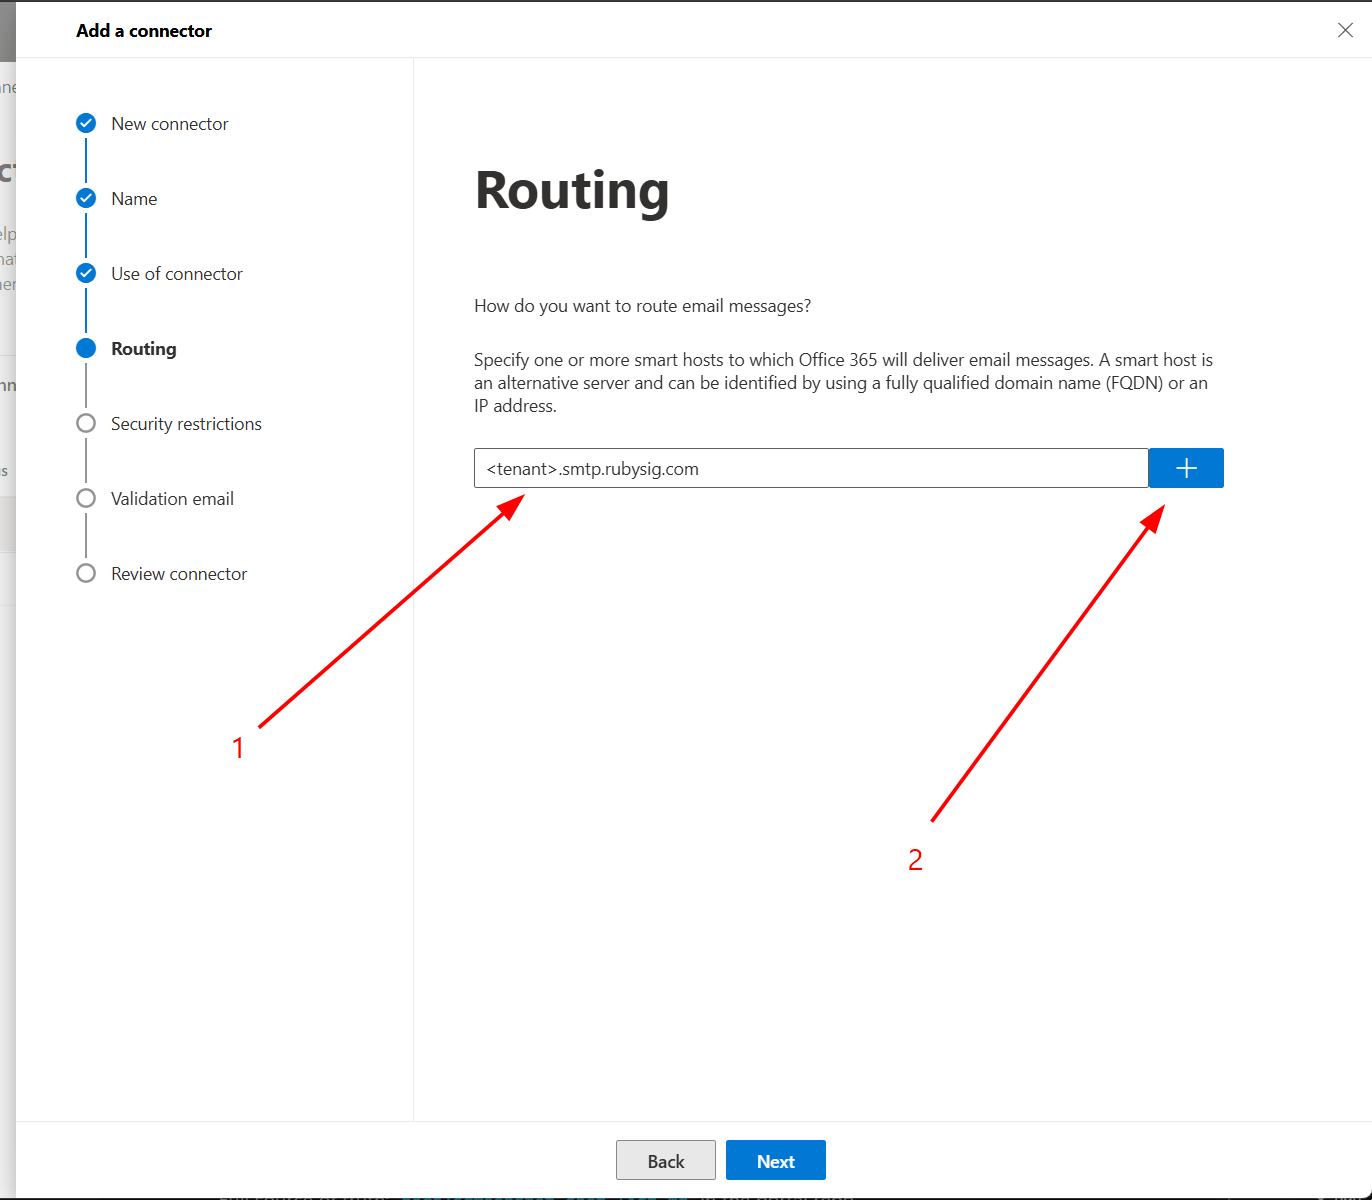
Caution: Paste the hostname with nothing after it. A trailing full stop — easy to pick up when copying from an email — produces the error "isn't a valid SMTP domain" on the validation step.
Security restrictions
Tick Always use Transport Layer Security (TLS), select Issued by a trusted certificate authority (CA), tick Add the subject name or subject alternative name (SAN) matches this domain name, and enter the same relay address.
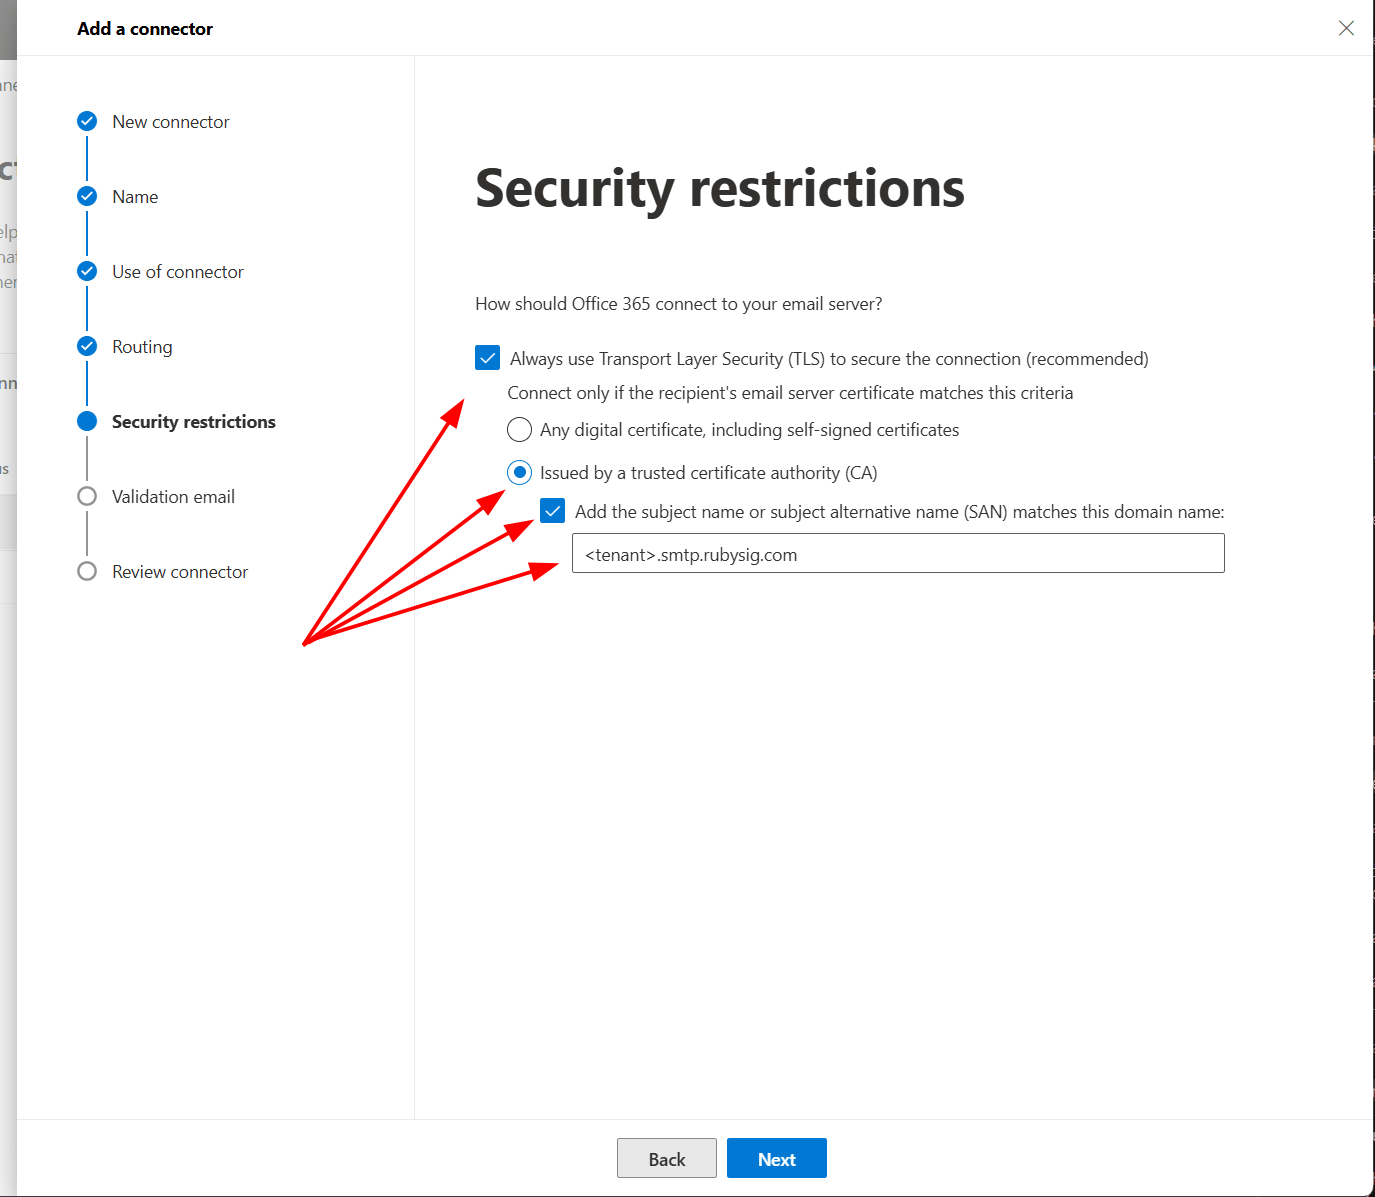
This is the screen that makes the connection yours. RubySig serves a publicly trusted certificate for your relay address, and Exchange checks it on every connection.
Validation
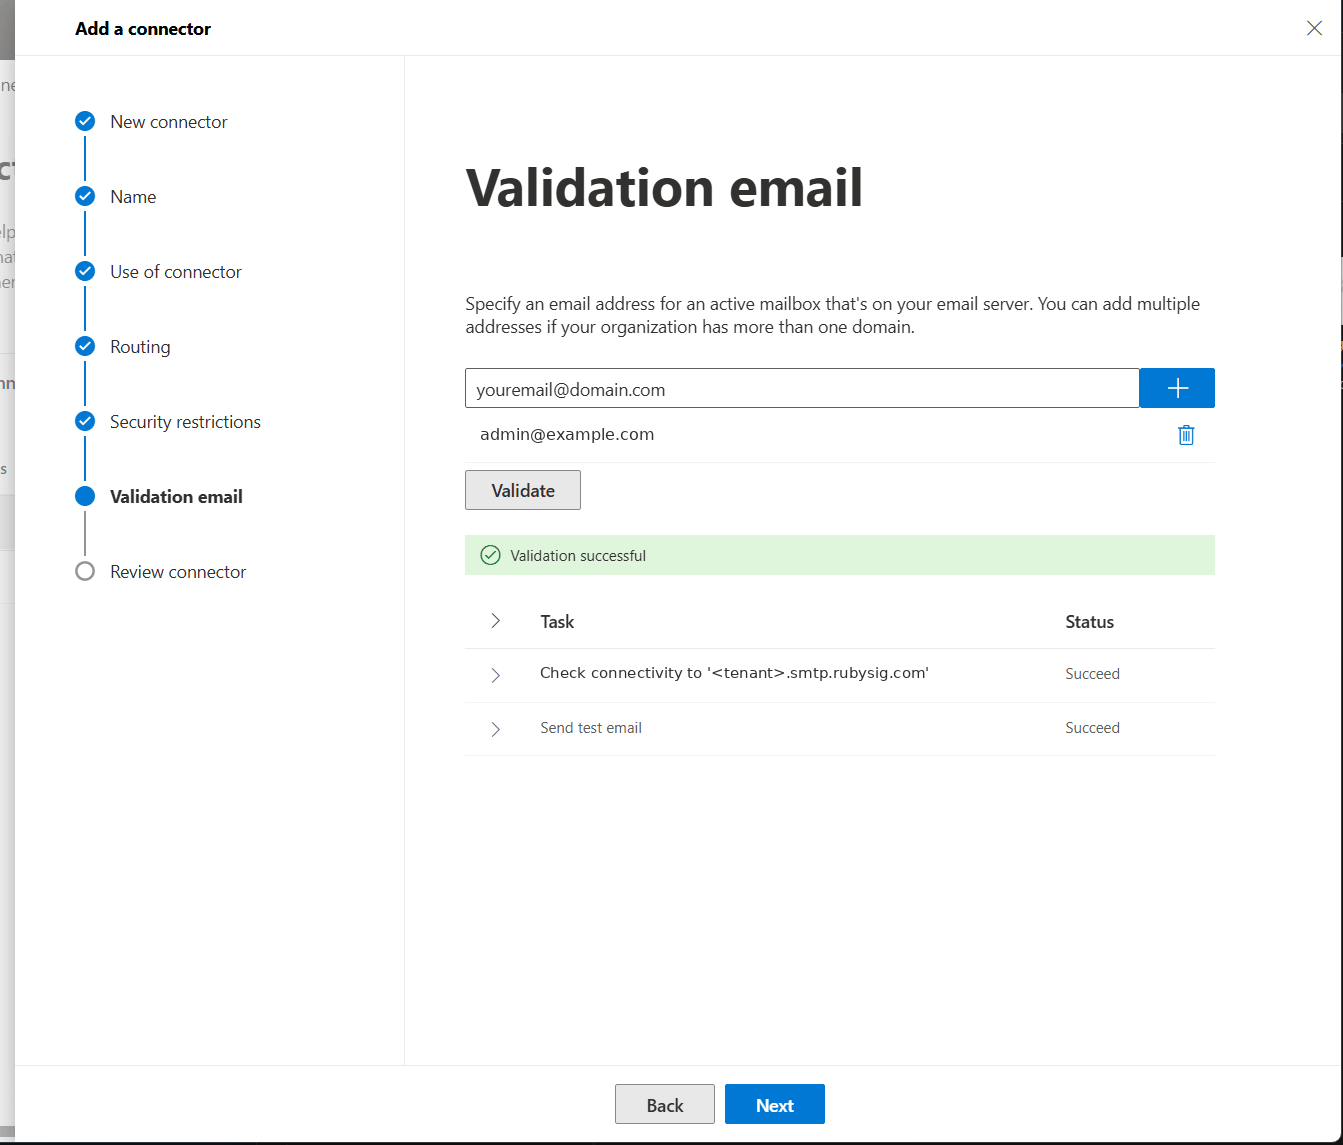
The wizard requires a validation before it will continue. Add an external address you control and click Validate.
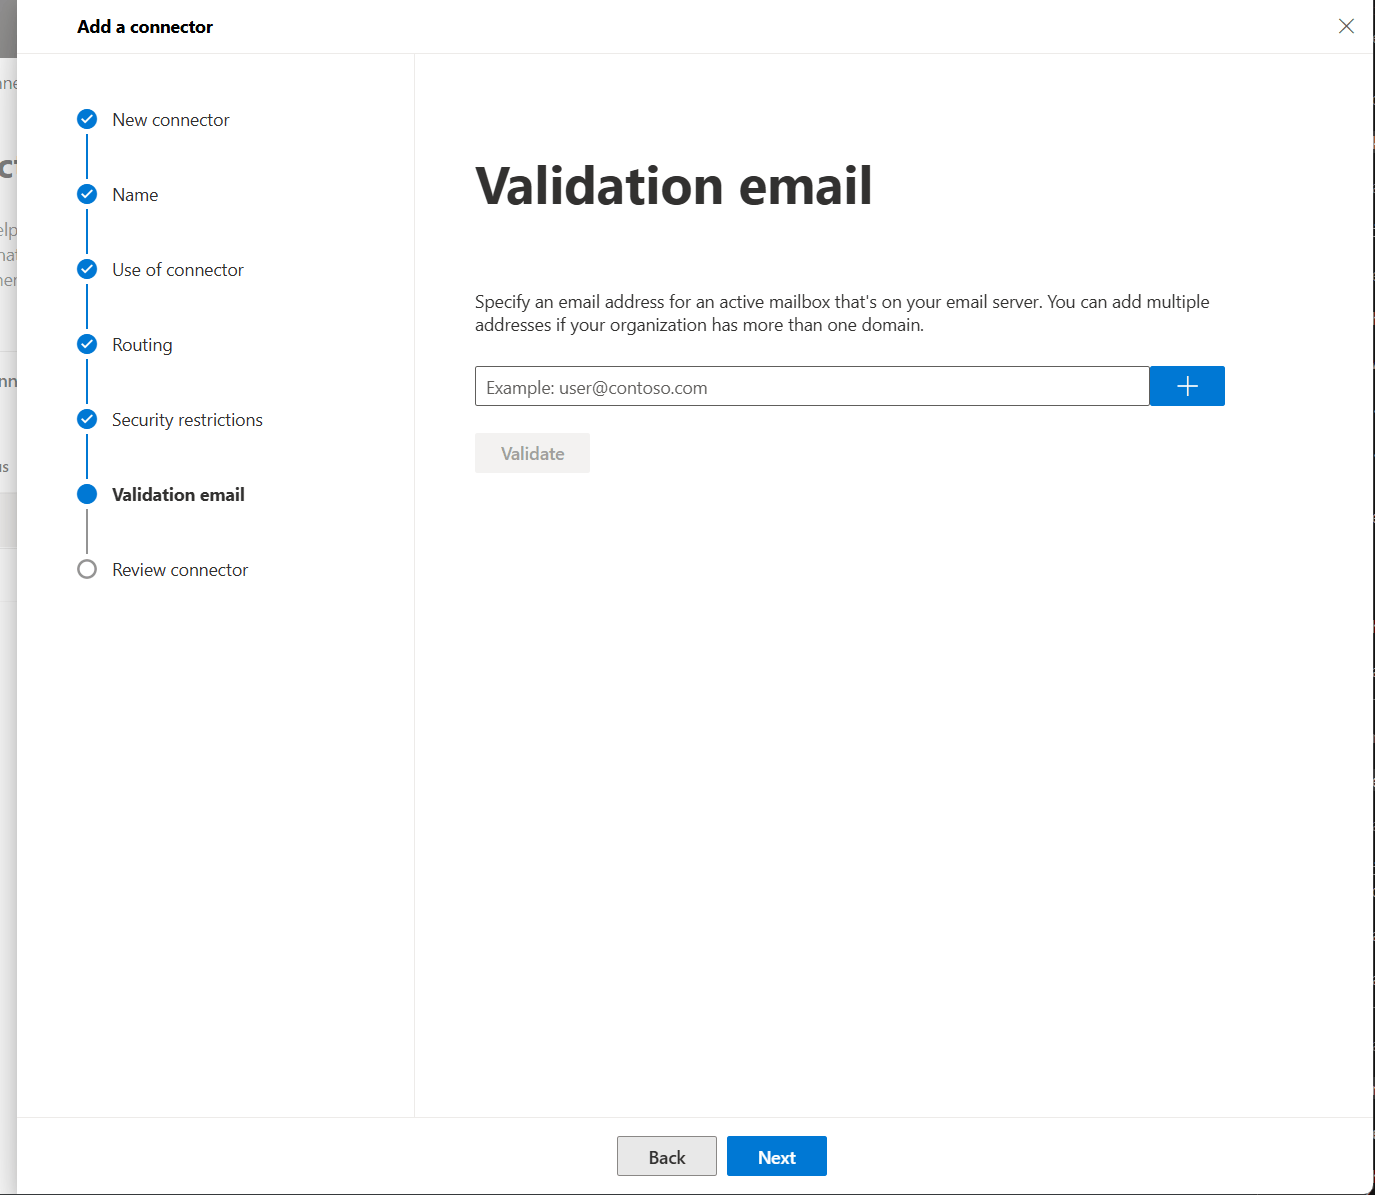
Exchange resolves your relay address, connects, checks the certificate, then sends a test message through the connector. All checks should succeed; the test message arrives in the mailbox you gave.
Review and create
Review the summary and click Create connector.
Step 2 — Inbound connector
Back on Mail flow → Connectors, choose Add a connector again. This one lets RubySig hand the stamped message back to Exchange for delivery.
Connection from and to
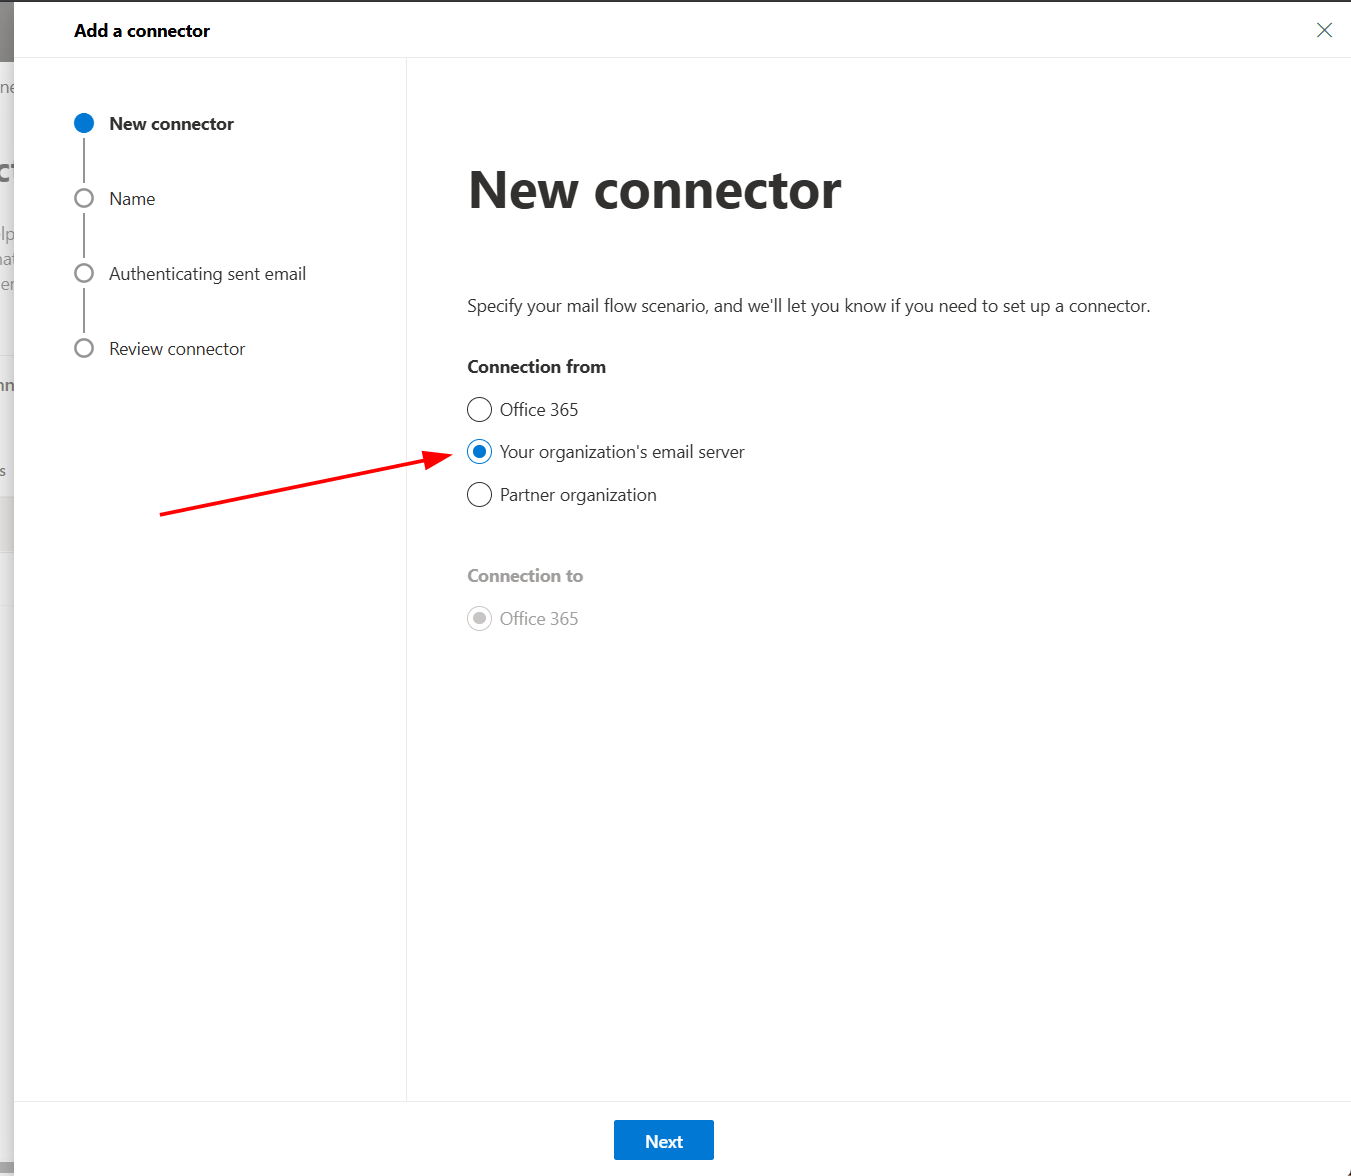
Under Connection from pick Your organization's email server. Connection to fills in as Office 365.
Name
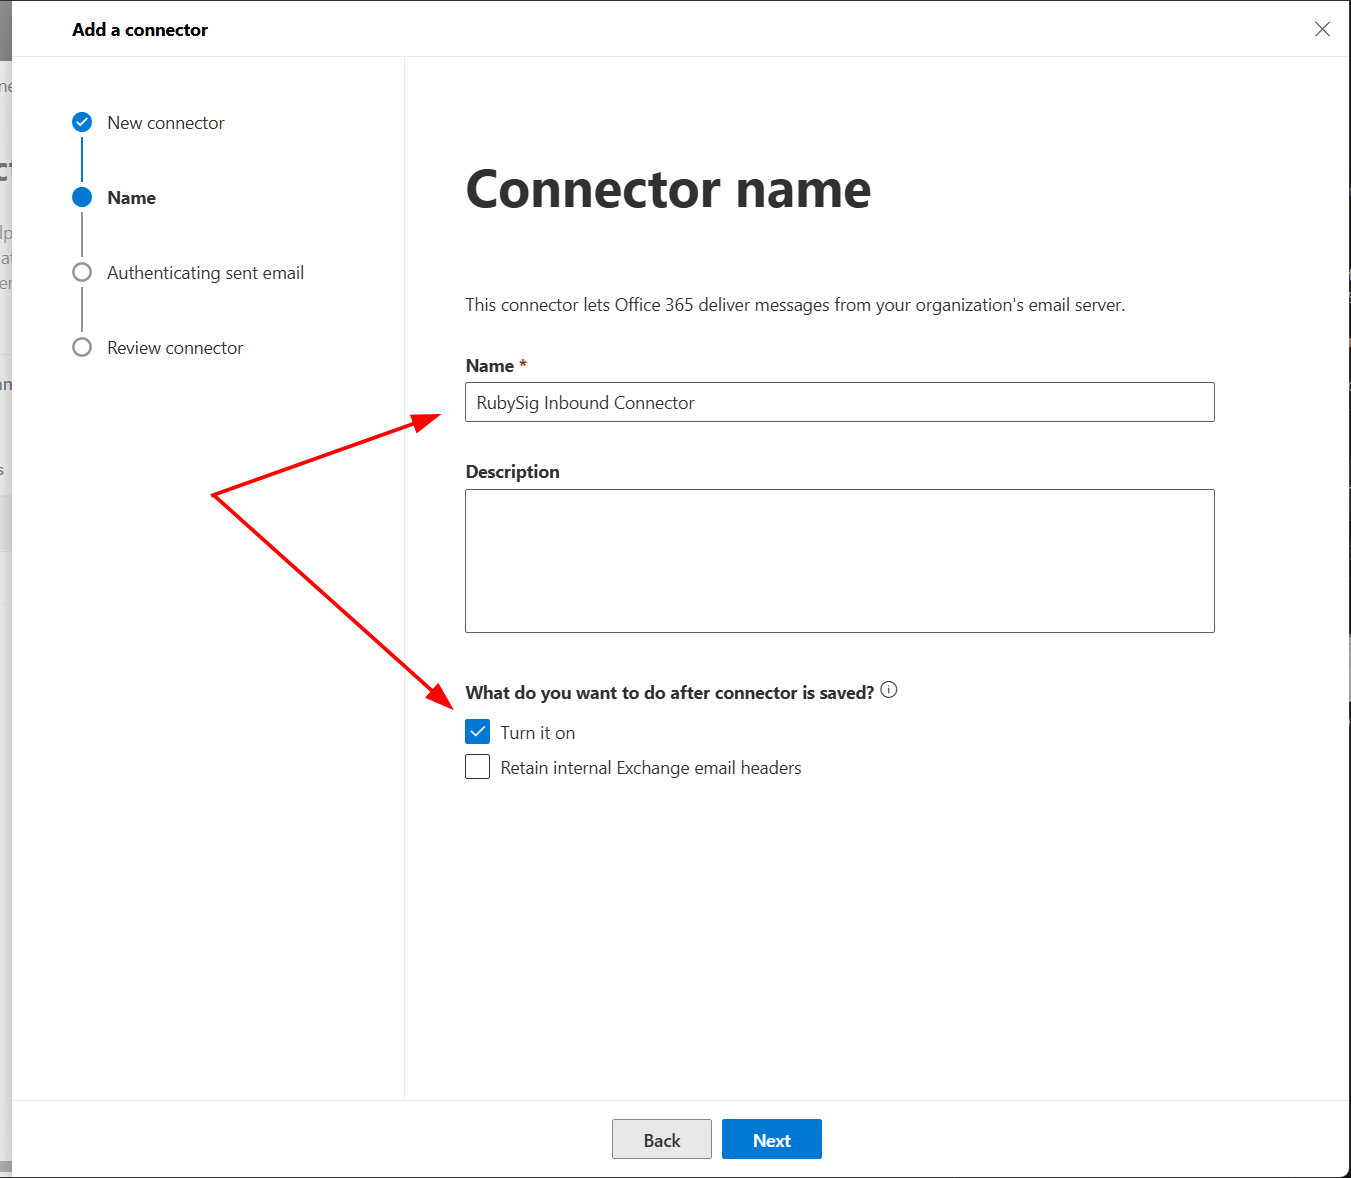
Name it RubySig Inbound. Tick Turn it on; leave Retain internal Exchange email headers unticked, for the same reason as before.
Authenticating sent email
Choose By verifying that the IP address of the sending server matches one of the following IP addresses and add the RubySig relay address:
167.233.237.1
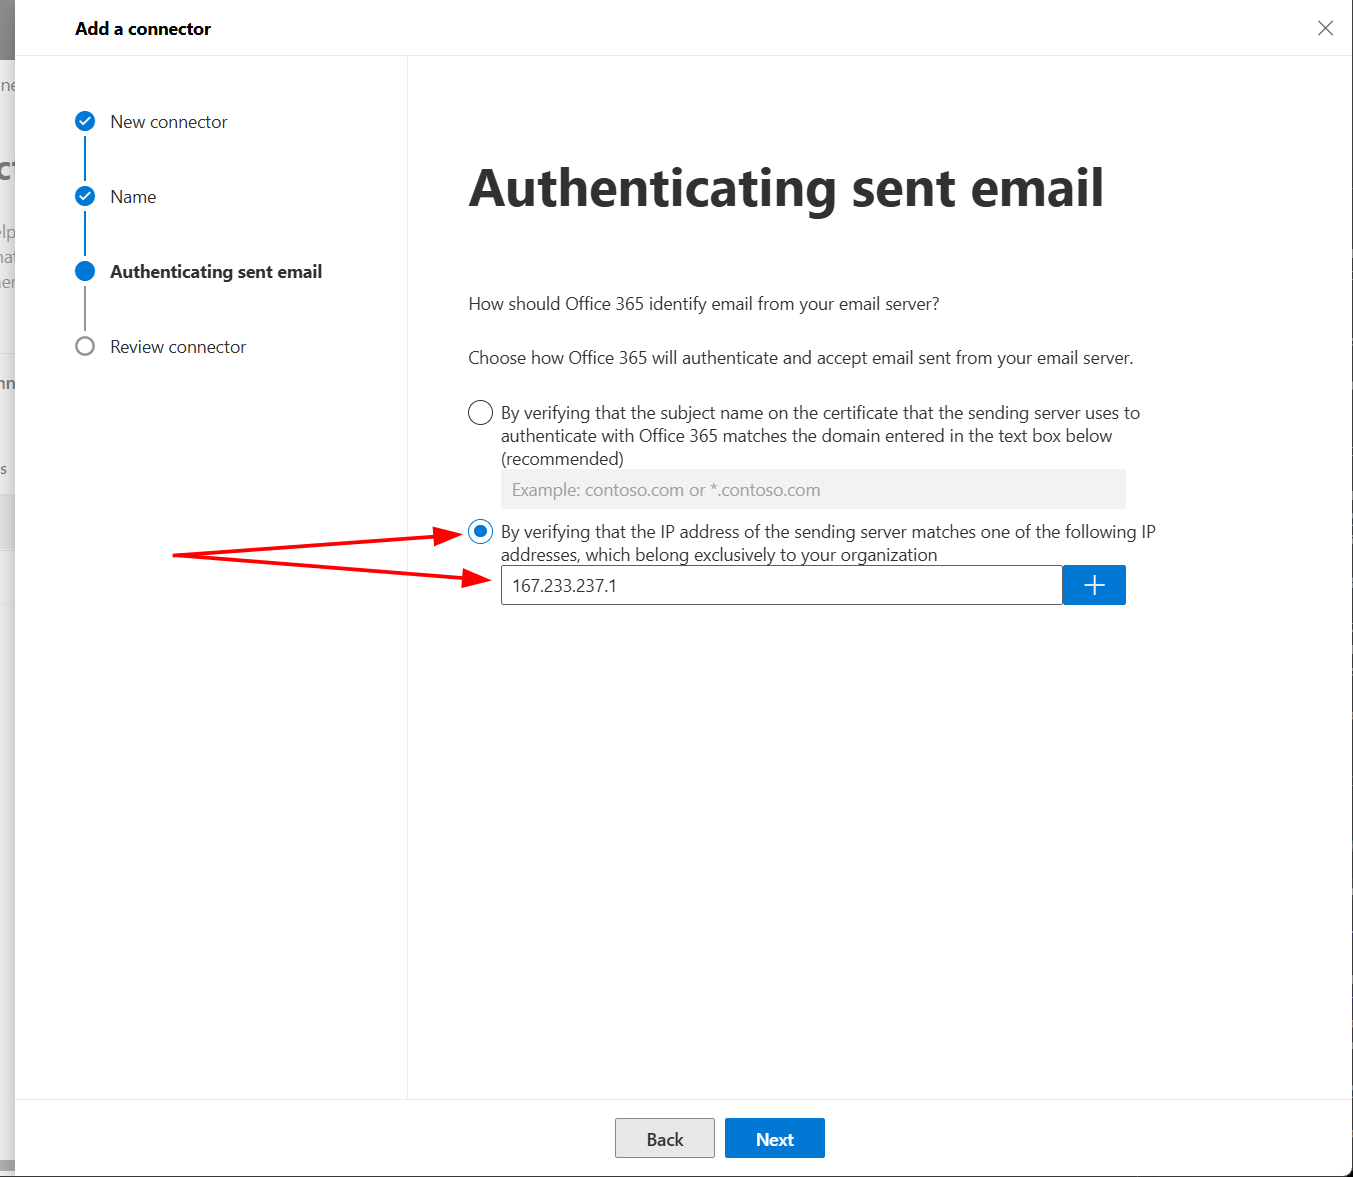
Note: Exchange only accepts IPv4 addresses on this screen, and that is all that is needed: RubySig always hands mail back from
167.233.237.1. The certificate option marked recommended is for organizations whose own server presents a certificate in their own domain; that is not how RubySig connects today.
Review and create
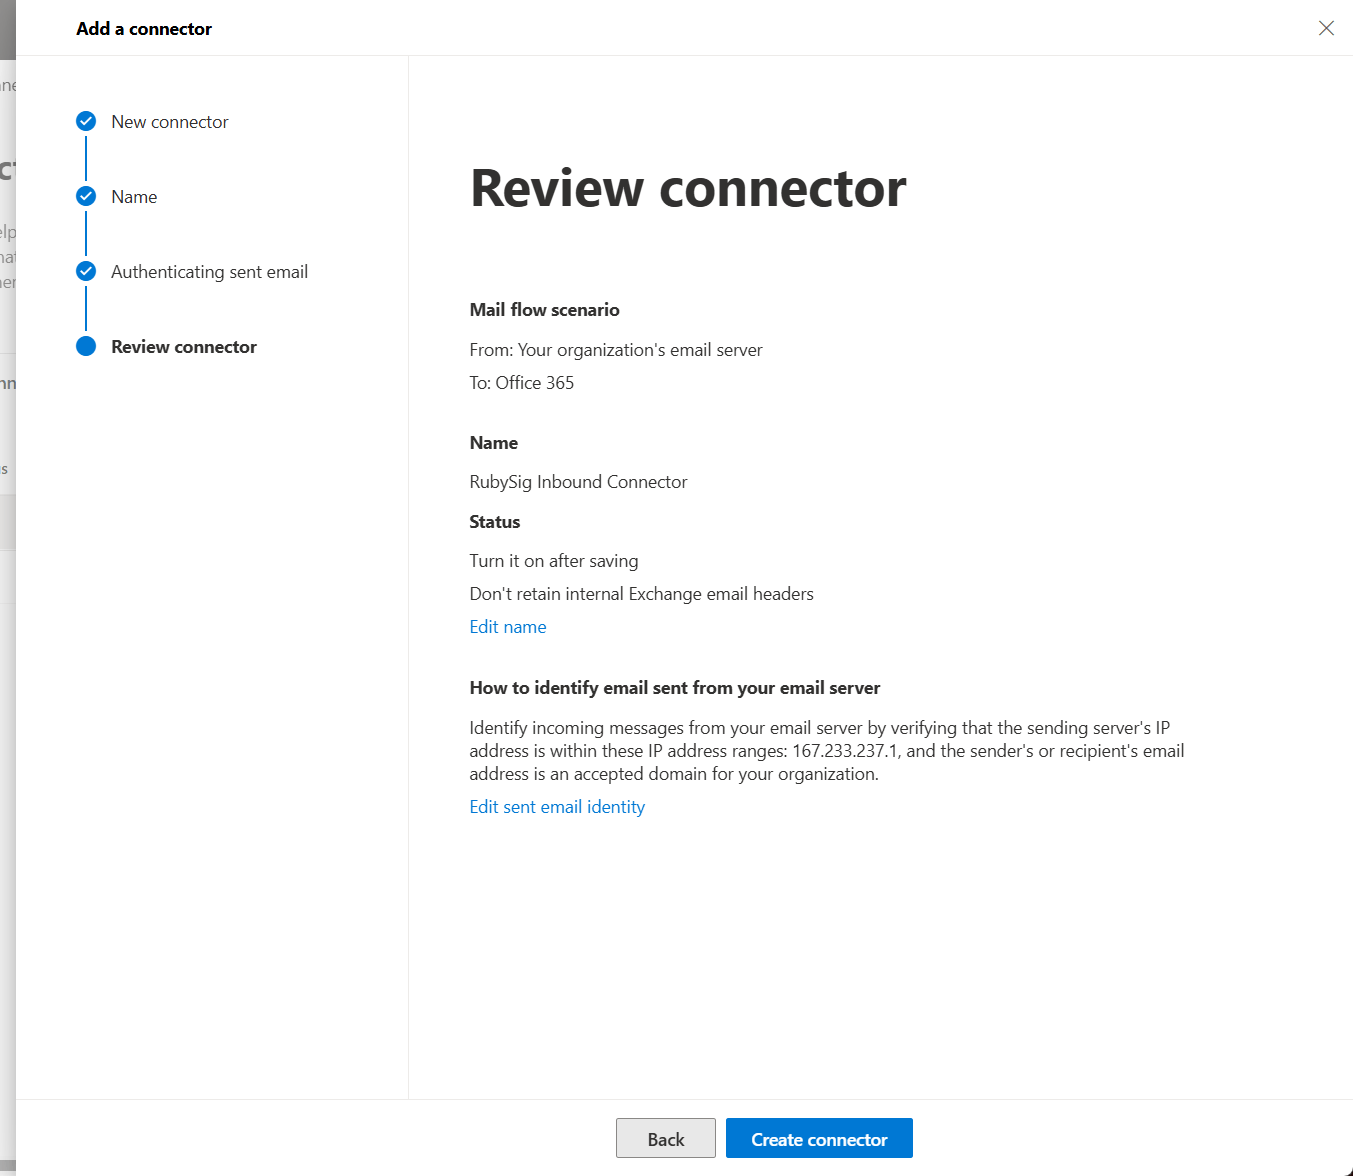
Click Create connector. You now have two connectors, both On.
Step 3 — Transport rule
This rule is the switch. It sends mail from your users to external recipients through the outbound connector — except mail that RubySig has already stamped. That exception is what stops a stamped message being sent back to RubySig forever.
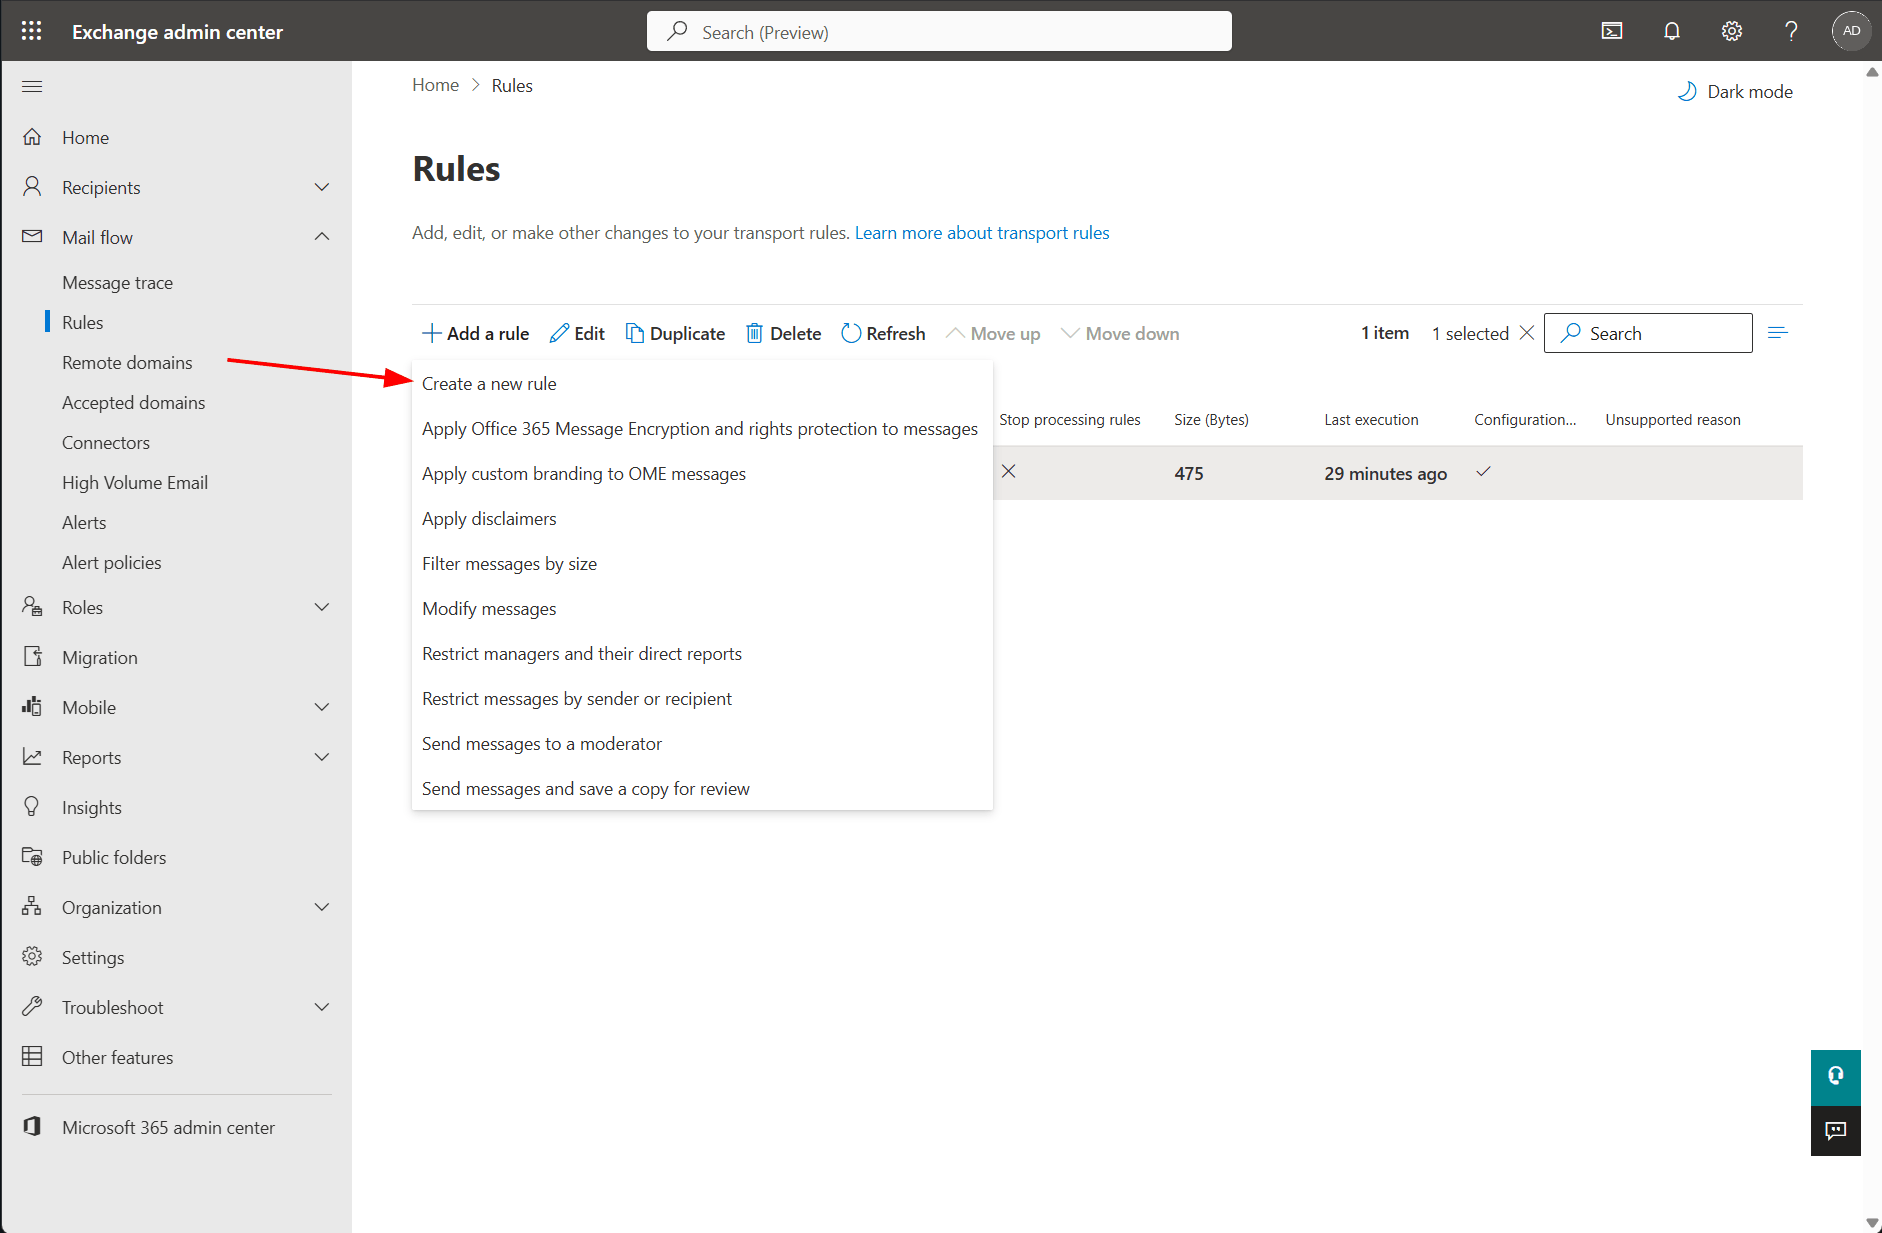
Open Mail flow → Rules, choose Add a rule, then Create a new rule.
Conditions, action and exception
Fill in the first screen as follows. The wording in the summary lines under each row is what to check against.
| Section | Setting | Value |
|---|---|---|
| Name | RubySig Stamp |
|
| Apply this rule if | The sender → is external/internal | Inside the organization |
| And | The recipient → is external/internal | Outside the organization |
| Do the following | Redirect the message to → the following connector | RubySig Outbound |
| Except if | The message headers… → includes any of these words | header X-RubySig-Stamped, word yes |
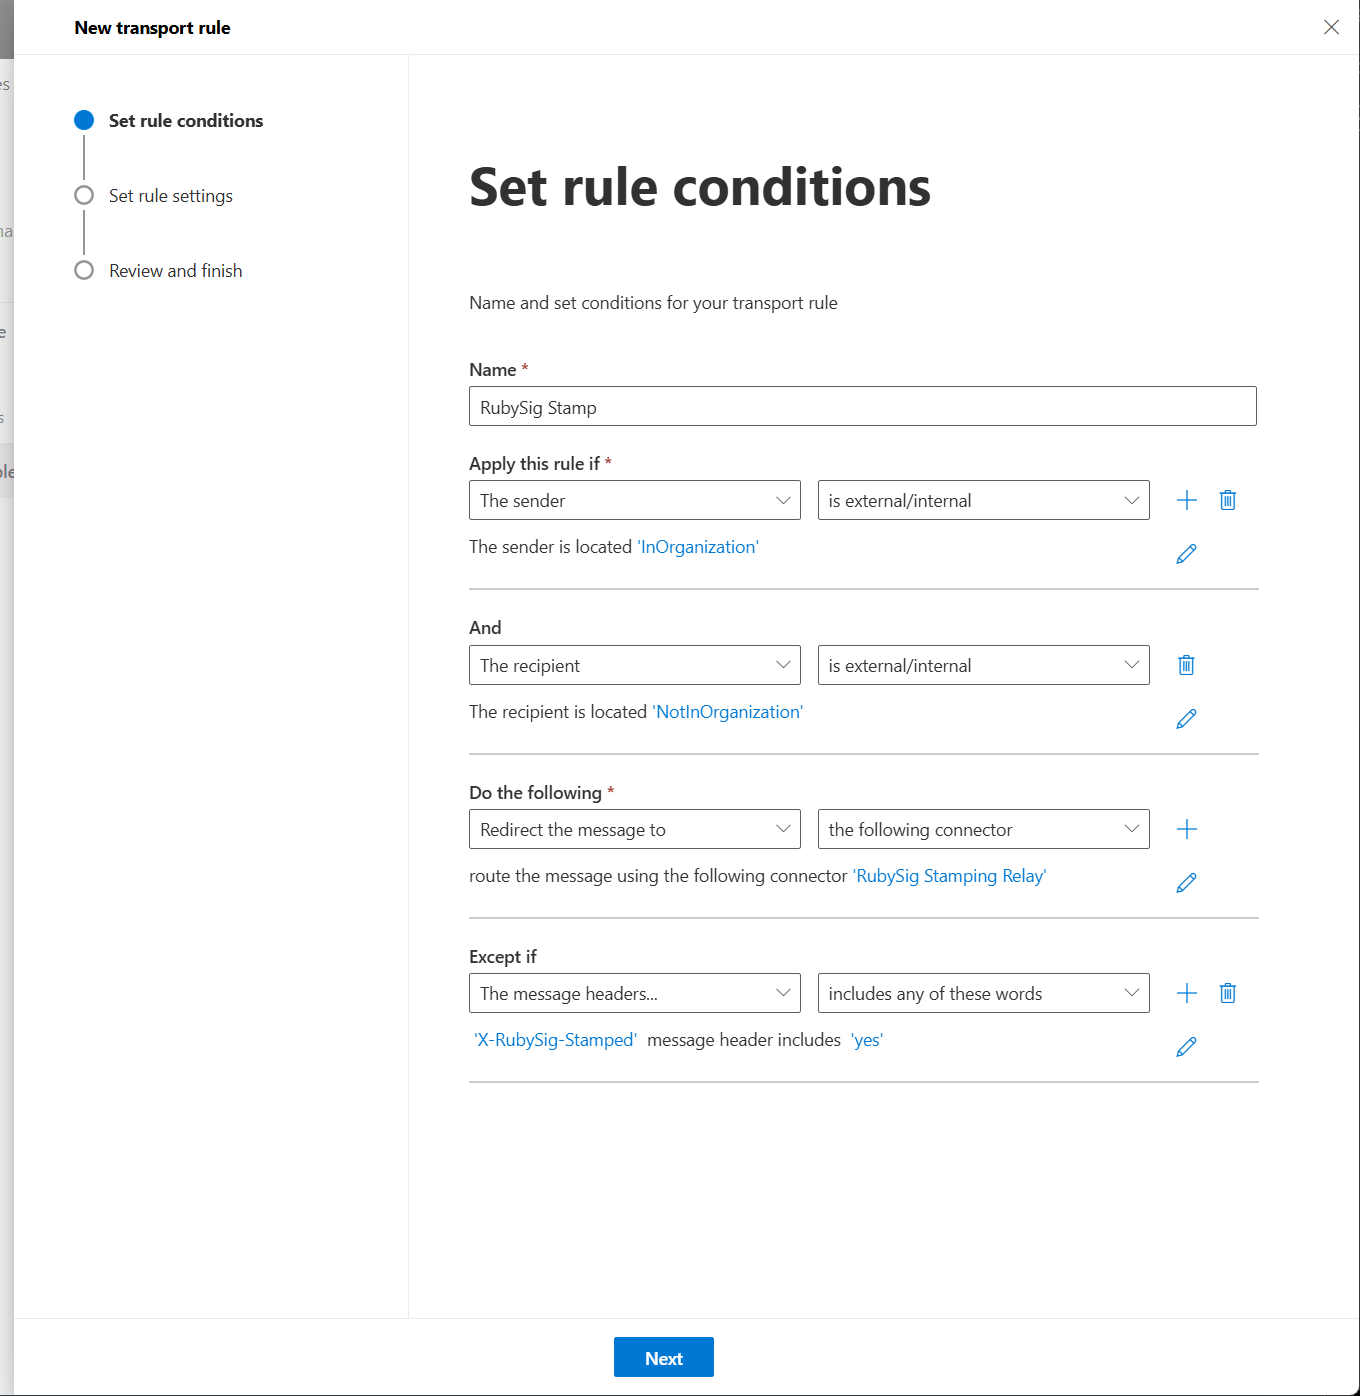
Caution: The two location conditions are easy to transpose. Read the summary lines: The sender is located 'InOrganization' and The recipient is located 'NotInOrganization'. Reversed, the rule routes your internal mail through RubySig and never touches the mail you wanted stamped.
The exception is the most important line in this guide. RubySig adds the header X-RubySig-Stamped: yes to every message it hands back. Without this exception, Exchange would match the returned message again and send it straight back to RubySig.
Rule settings
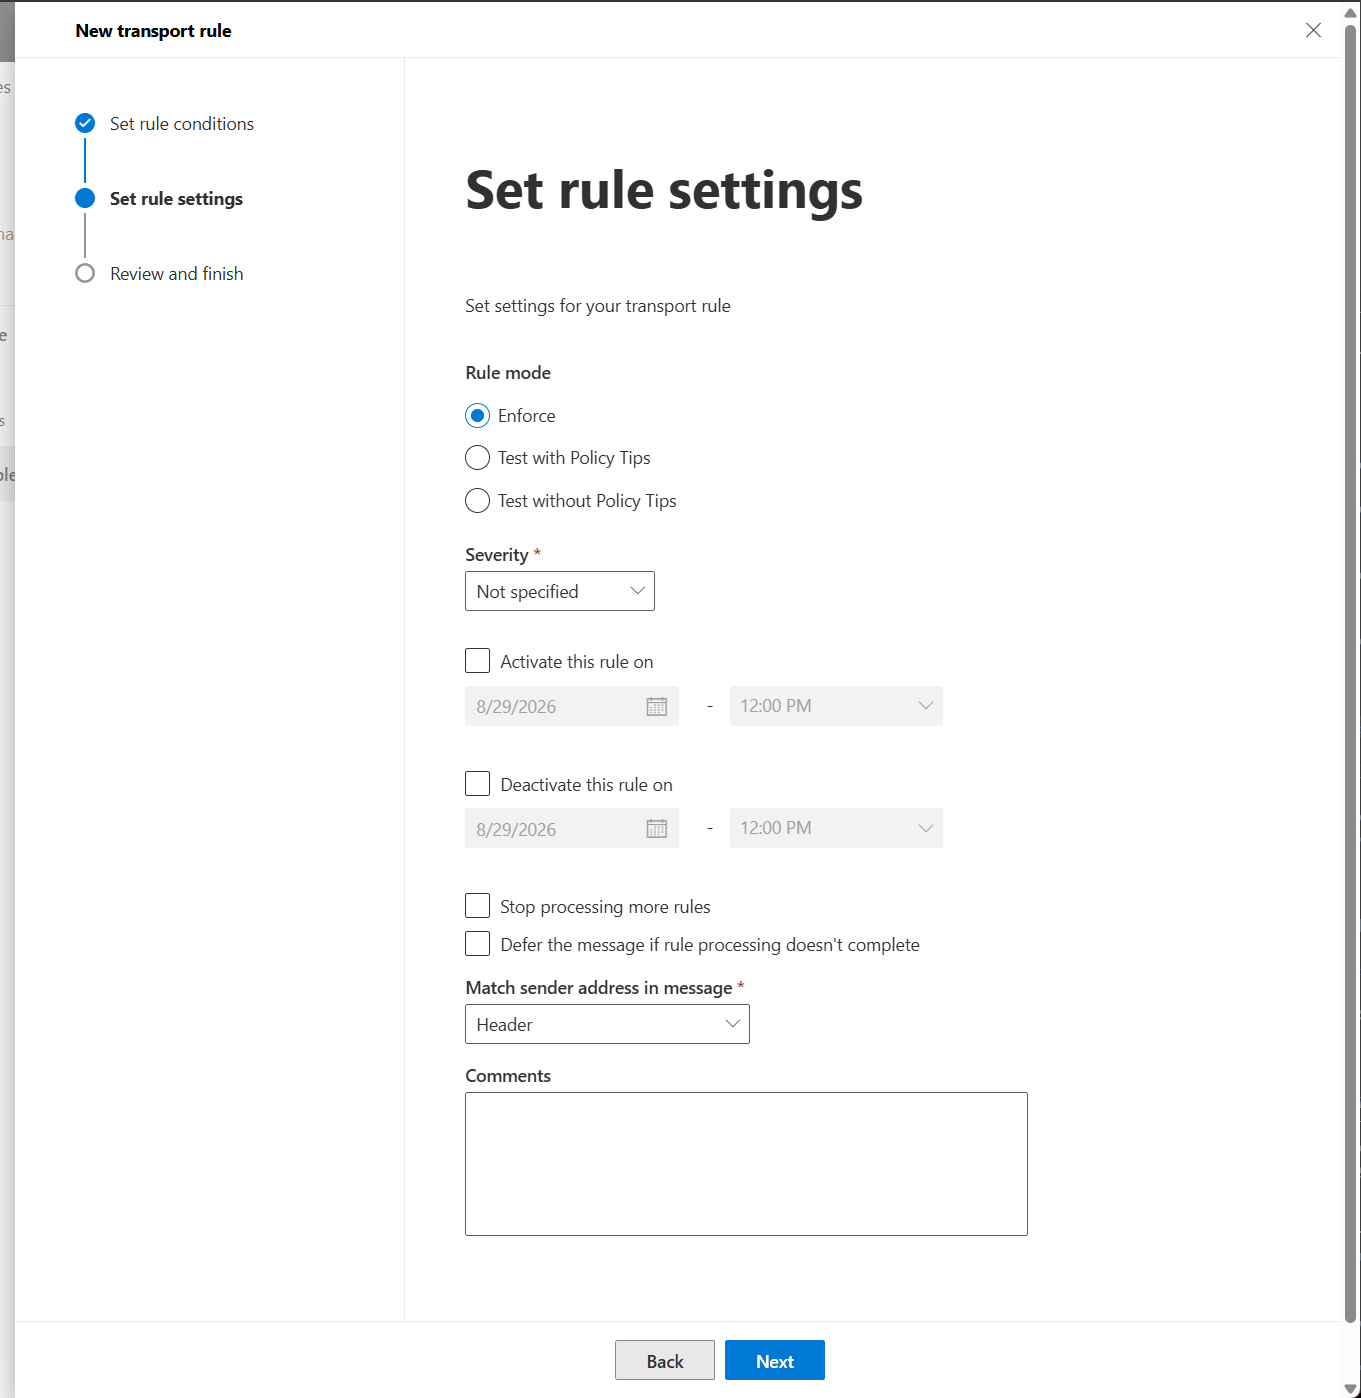
Leave Enforce selected, severity Not specified, and both Stop processing more rules and Defer the message unticked. Match sender address in message stays on Header.
Review and finish
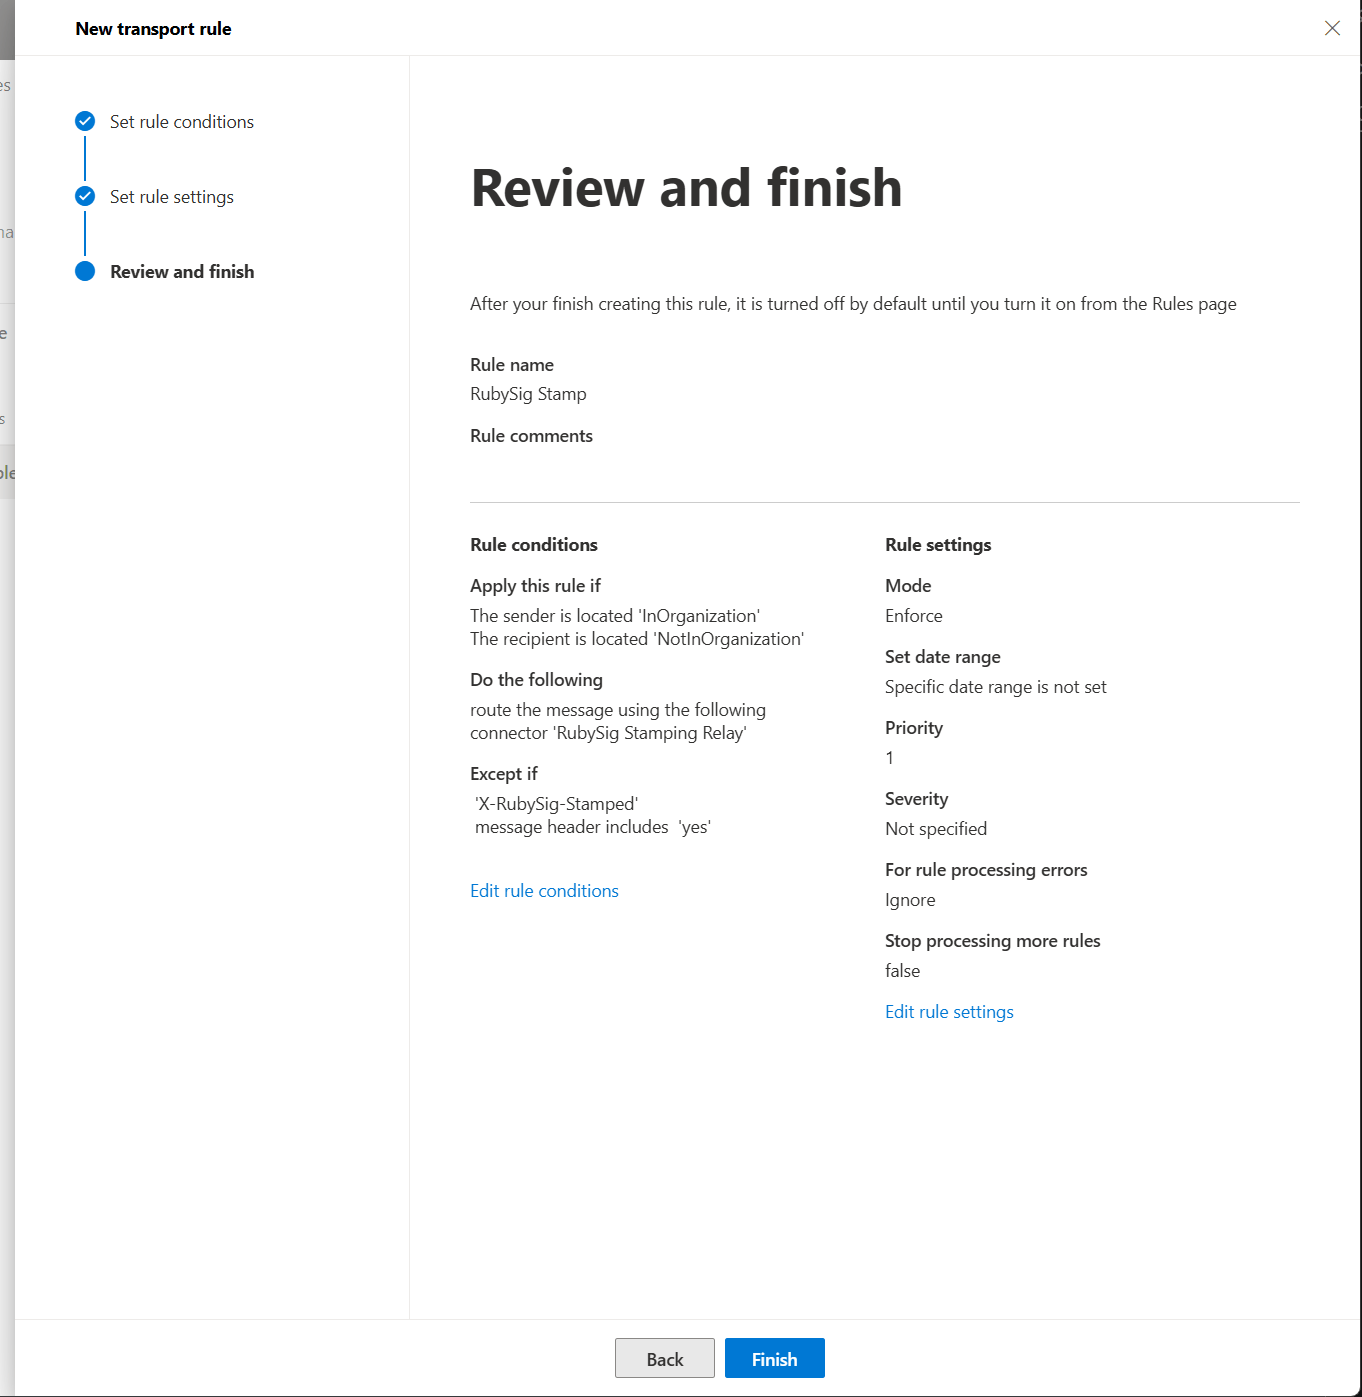
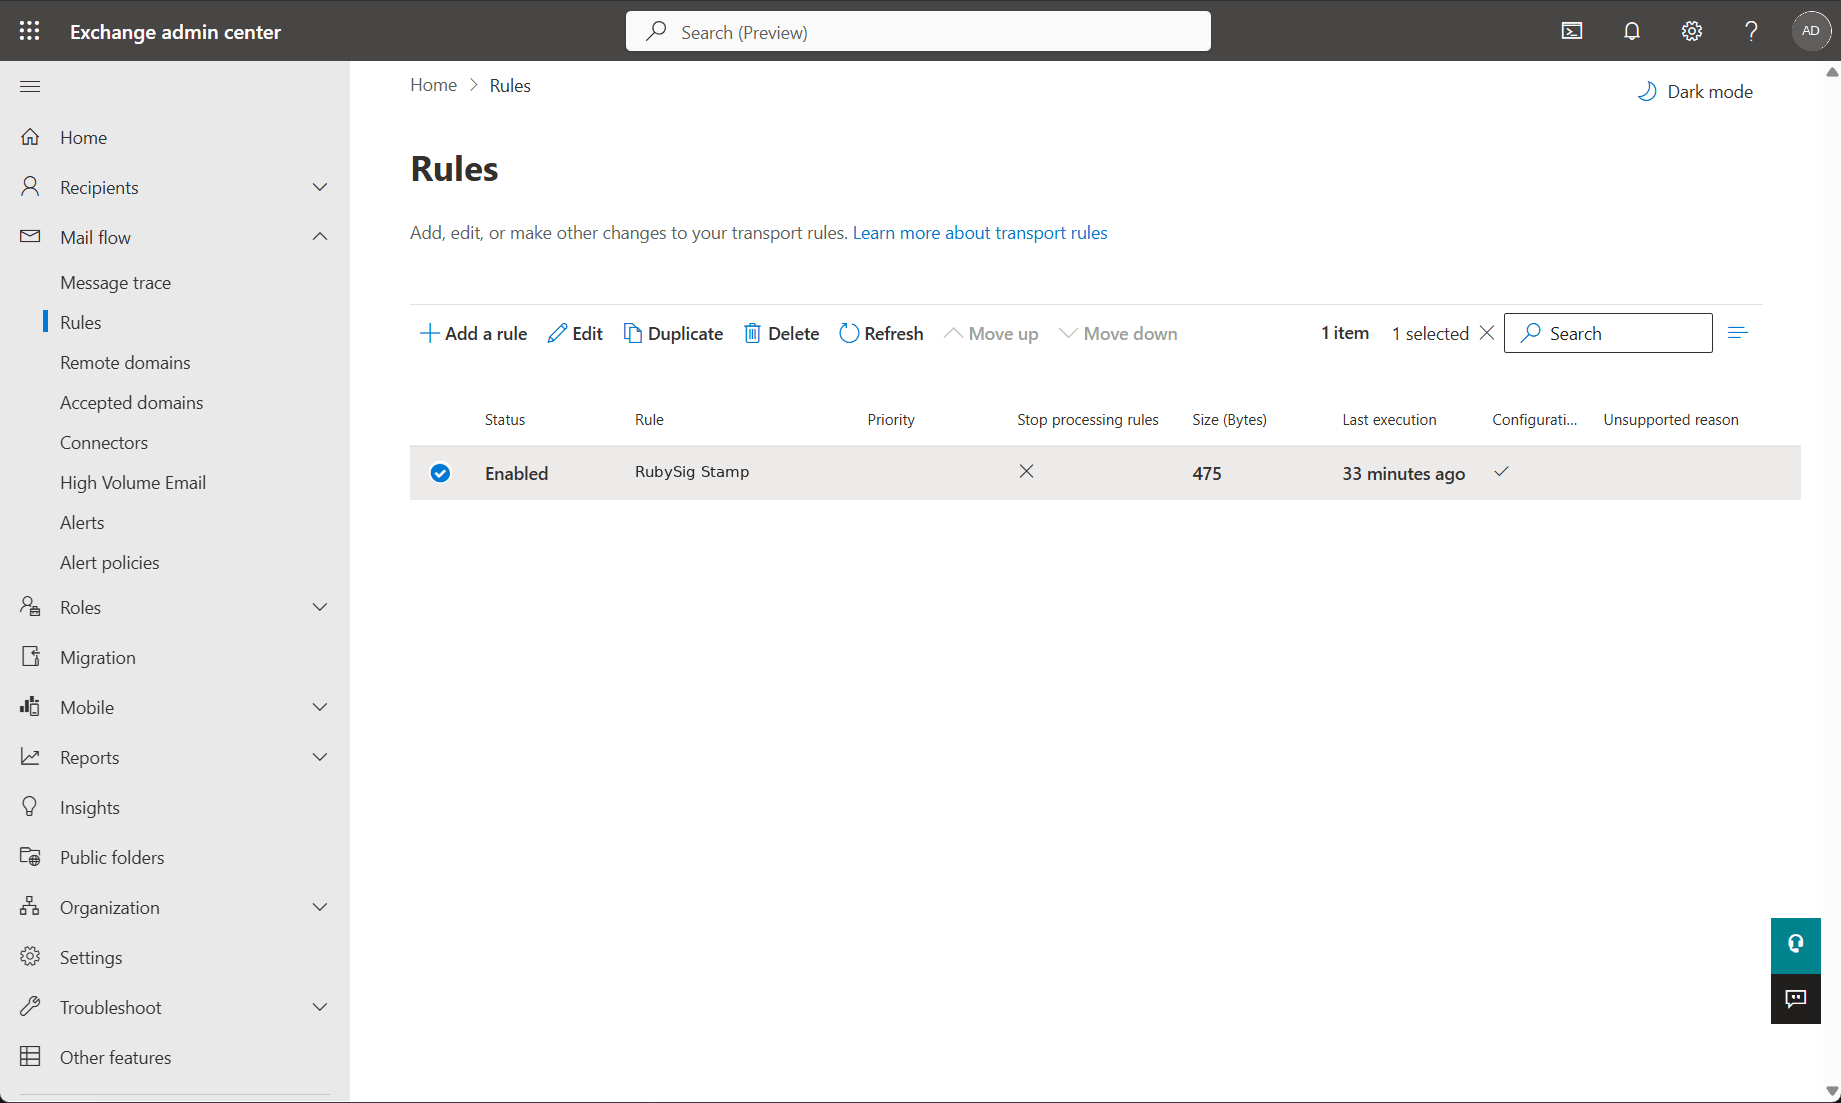
Click Finish. A new rule is created turned off. On the Rules page, select it and enable it.
Step 4 — DNS
RubySig signs your mail with a DKIM key for your domain, so the public half of that key has to be published in your DNS. Add one TXT record; the exact name and value are on the portal's Setup page and explained in DKIM.
| Type | Name | Value |
|---|---|---|
| TXT | rubysig1._domainkey |
(from Portal → Setup) |
Optionally, add the relay's address to your SPF record so that Microsoft's own filters see the returned message as authorised; see SPF & DMARC. Your existing include:spf.protection.outlook.com stays.
Step 5 — Send a test message
From a licensed mailbox, send a message to the external address you used for validation. Open it there and view the headers (Gmail: ⋮ → Show original). You are looking for three things:
X-RubySig-Stamped: yesdkim=pass … header.d=<your domain> header.s=rubysig1- a
Received:line fromrelay.rubysig.com
And, of course, the signature at the bottom of the message. Verifying your setup shows what a healthy set of headers looks like.
What you have now
Two connectors and one rule. Mail from inside to outside your organization detours through RubySig for a second and comes back stamped and signed; everything else — internal mail, inbound mail, MX — is exactly as it was. To take RubySig out of the path at any time, disable the transport rule; the connectors can stay.